How To: Ditching Ubuntu in favor of Arch Linux for a Deep Learning Workstation
Why should I ditch Ubuntu?
Most of you might be using Ubuntu for their workstations, and that is fine for the more inexperienced users. One of the issues I had with Ubuntu and the Tensorflow/CUDA though, has been that handling the different drivers and versions of CUDA, cudnn, TensorFlow, and so on has been quite a struggle. I’m not sure about you, but once I had a working Tensorflow 1.15 or 2.0 environment, I usually did not touch it anymore being scared to mess up this holy configuration.
Working with different programs it would be nice to have a way of switching between the two most used TensorFlow versions of 1.15 and 2.0 like you can do with Google Colab in a single command, but installing a different TensorFlow version usually messed up my system again.
Additionally, Arch has always been on my To-Do list, as it is the most “barebone” Linux distro you can get, meaning you are working way closer on the hardware compared to “higher abstractions” like Ubuntu. In their own words, Ubuntu is built to “work out of the box and make the installation process as easy as possible for new users”, whilst the motto of Arch Linux is “customize everything”. Being way closer to the hardware Arch is insanely faster compared to Ubuntu (and miles ahead of Windows), for the cost of more Terminal usage.
When I have been using Arch in the past weeks, RAM usage usually halved compared to Ubuntu, and installing Machine Learning packages is a breeze. I can have both TensorFlow 1.15 and 2.0 working together, switching the versions with Anaconda environments. Also, the system works quite stable, as I am using the LTS (long term support) kernels of Linux, and usually updates to the famous AUR (user-made packages in Arch) are coming out a month ahead of the Debian (Ubuntu) packages.
All in all, I can only recommend setting up an Arch Linux Deep Learning station as it is:
- Faster, like packages will install super fast, deep learning is supercharged, …
- More stable
- Easier to switch between TensorFlow versions compared to Ubuntu.
I will split the how-to in two parts, the first one being “How to I install Arch Linux” and the second one being “How to install the Deep Learning workstation packages”.
For the general “How to install Arch Linux”, head over to this article.
If Arch is too complex for now, you could try out Manjaro, which is a user-friendly version of Arch, even though I can not guarantee that all packages will work the same, as they are slightly different. All in all it should work the same though.
I was thinking about creating a ready to install Image (iso or img), if enough people are interested leave a comment below or message me!
Installing the Deep Learning (TensorFlow, CUDA, CUDNN, Anaconda) setup on a fresh Arch Linux installation
Once you are done with the Arch installation (phew!), let us first change some settings such that our system works more stable.
1. Switching to the fastest mirrors
Software is downloaded from so-called “mirrors”, which are servers containing all the Arch libraries. If not done automatically, it could happen that your servers are not optimized yet. Therefore, we are going to install a small tool that finds and saves the fastest servers called “reflector”
Install reflector using
sudo pacman -S reflector
Find and download the best servers
reflector –verbose -l 20 -n 20 –sort rate –save /etc/pacman.d/mirrorlist
Check the output if it makes sense, e.g. if the domains are close to your location. If not, you could add the country tag to get more precise results, e.g. for Germany and Austria:
reflector -c “AT,DE” –verbose -l 20 -n 20 –sort rate –save /etc/pacman.d/mirrorlist
Update your installation
sudo pacman -Syyu
2. Changing the Desktop Environment
If you are using Manjaro or chose the “Gnome” Desktop environment as you know it from Ubuntu, it might be worth it to think about changing it as Gnome is known to eat more RAM than Chrome, and we surely need RAM in our Deep Learning setup.
If you like Gnome, feel free to skip this step. Otherwise, I can recommend the Xfce desktop as it is a good combination of lightweight and full of features.
Download Xfce
sudo pacman -S xfce4 xfce4-goodies lxdm
Lxdm is a display manager that allows you to use multiple desktops.
Log out of your current session and press Alt + F2 (or Alt + F3 if it does not work) to get a terminal. First disable Gnome and afterward “activate” Xfce:
Deactivate and uninstall gnome:
sudo systemctl disable gdm
sudo pacman -R gnome gnome-extras
Activate Xfce
sudo systemctl enable lxdm
sudo systemctl start lxdm
If the new Xfce desktop does open just login and explore, if not try to reboot (sudo reboot). If that does not help proceed to crying and rolling on the floor, and send me a message or comment afterward.
3. Installing the LTS (long term support) Linux kernels for better stability
Arch is famous for being really close to the current Linux kernels, which is good if you always want the newest packages and Linux features, but a bad idea if you are building a Deep Learning Workstation.
That is why I switched to the LTS kernels, which are basically kernels that receive more support and are more stable than the newer versions of the Linux Kernel.
Luckily switching kernels is super easy in Arch. First we will download the kernels, and afterward tell our boot manager which kernel to choose.
First download the LTS kernels:
sudo pacman -S linux-lts linux-lts-headers
Have a look at your current kernel versions:
ls -lsha /boot
One kernel should be named vmlinuz-linux.img and initramfs-linux.img (your current versions) and the LTS ones the same with -lts at the end.
If you are seeing two kernels you can now proceed to delete the old kernels:
sudo pacman -R linux
Now a more advanced part is that you will need to tell your bootloader which kernel to choose. The question is which bootloader you are using, but in most cases it is Grub. If you followed my Arch installation tutorial your bootloader is systemd-boot.
My recommendation is try the Grub instructions, and if that does not work proceed to the others.
Changing the Grub bootloader for the LTS linux kernels
grub-mkconfig -o /boot/grub/grub.cfg
If you see an error proceed to the next bootloader, otherwise reboot (sudo reboot).
Changing the syslinux bootloader for the LTS linux kernels
Edit the config file:
sudo nano /boot/syslinux/syslinux.cfg
Simply add “-lts” to the vmlinuz-linux.img and initramfs-linux.img, such that they are vmlinuz-linux-lts.img and initramfs-linux-lts.img
Changing the systemd-boot bootloader for the LTS linux kernels
If you are coming from my Arch installation guide, this is your bootloader.
Edit the config file:
sudo nano /boot/loader/entries/arch.conf
Simply add “-lts” to the vmlinuz-linux.img and initramfs-linux.img, such that they are vmlinuz-linux-lts.img and initramfs-linux-lts.img
4. Installing yay, an easy way to install AUR packages
You should prefer to use the ultra-fast pacman to install most packages, but an amazing thing about Arch is that users create millions of custom packages that are super easy to install. You can basically find any program you can think of in this repo.
Install git SVC
sudo pacman -S git
mkdir ~/tmp
git clone https://aur.archlinux.org/yay-git.git ~/tmp/yay
cd ~/tmp/yay
makepkg -si
Now you can browse all the nice AUR packages in https://aur.archlinux.org/packages/ or just go for it and type:
yay -S [PACKAGE]
To install it.
5. Finally, the real cuda, cudnn, anaconda installation running both TensorFlow 1.15 and 2.0
Install Nvidia drivers, cuda, cudnn with a simple command
sudo pacman -S nvidia nvidia-utils cuda cudnn
This takes some time, so grab a coffee or proceed with the next steps
Download Anaconda, I like Miniconda:
wget https://repo.anaconda.com/miniconda/Miniconda3-latest-Linux-x86_64.sh ~/
Make it executable and install
cd ~/
chmod +x ./Miniconda*.sh
./Miniconda*.sh
Just leave everything as default.
source ./bash_profile
Reboot your system
sudo reboot
Install tensorflow
Now is the time to decide between TensorFlow for CPU or GPU. I will continue with the GPU option, but if you want to run the CPU version just remove the “-gpu” from the package name.
Create an anaconda environment for Tensorflow 2.0
conda create –name tf2.0
conda activate tf2.0
conda install pip
conda install tensorflow-gpu pandas numpy
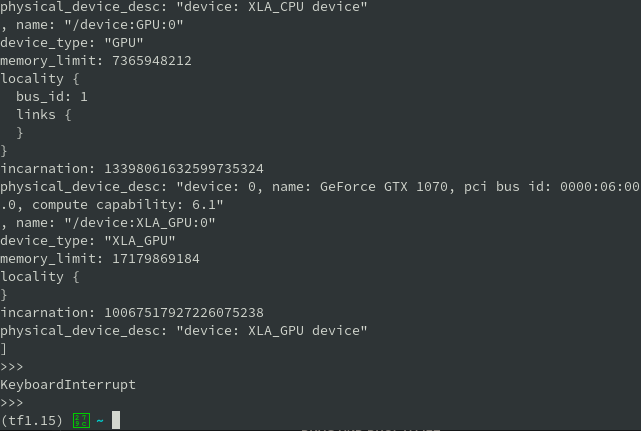
Done! Now check the result with:
python
from tensorflow.python.client import device_lib
device_lib.list_local_devices()
If the result shows a device name like this you are done!
2018-05-01 05:25:25.929575: I tensorflow/core/common_runtime/gpu/gpu_device.cc:1356] Found device 0 with properties: name: GeForce GTX 3080 10GB major: …
Create an anaconda environment for Tensorflow 1.15
conda deactivate
conda create –name tf1.15
conda activate tf1.15
conda install pip python==3.7
conda install tensorflow-gpu==1.15
And again check if everything works and your gpu is recognized:
python
from tensorflow.python.client import device_lib
device_lib.list_local_devices()
6. Switching between TensorFlow 1.15 and TensorFlow 2.0 on one device!
Just a dream coming true in my opinion, just select the 1.15 version with
conda activate tf1.15
And the TensorFlow 2.0 version with
conda activate tf2.0